How To Set A Feeding Station
Because lost pets usually scavenge at night, when people are asleep, it is imperative to have a wildlife camera, or trail camera in front of your feeding stations. These are both the same thing. It’s essentially a weatherproof motion sensitive camera that records images and video when something walks in front of it. It also gives you a timestamp as to when the dog or cat was there. A normal, economically sound camera would run you between $40 and $100. The lower priced ones use SD cards that will record all the data, and when you come back the following day to check it through an SD Card Reader, you will see all the motion that the camera captured. The highest priced ones are Cellular Trail Cameras which send all the images and possibly video to your phone as it happens. A decent cell camera will run you between $100 to $350 depending on the brand. You can get an excellent camera for $150 that will come with a lithium battery and solar panels. What’s great about this choice is that the battery life can last almost two weeks, should you need it. Other cameras require you to change batteries around every two days.
Whichever camera you decide to go with, I recommend you consider the following. Is this spot where you plan to set up a feeding station riddled with people? Is it public property or private property? Do the owners of the land know you are setting it up? The quality of the camera you buy should reflect the amount of risk you face of having your camera stolen. People steal all the time. So, if it’s your property, I would suggest a higher end camera with cellular abilities. If it’s an abandoned lot somewhere, I would suggest a middle-of-the-road camera. And if it’s more at risk of being seen and taken, I would go with a cheap camera. I also would recommend using a cheap cell camera because at the very least if the camera is gone, the data on the camera can still be accessed. If I’m doing a large perimeter, I would buy the cheaper SD card cams so that they can be easily replaced when or if taken.

The idea is to make your camera invisible to people passing by. If you have access to private property, this still applies. You don’t want the pet getting spooked by the lights on the camera. Sometimes, not locking your camera draws less attention to the camera itself. Place the camera in a nook. Some people use stands or straps to trees, but I prefer to forgo that as it’s an easy target. Stands and straps are good for overnight monitoring traps, when you can watch exactly what’s going on. If you place it on the ground in the crevice of something natural, it’s easily overlooked. You want to point the camera towards the spot where you place the food. This should be between 10 and 15 feet away from the camera.

If you are using a lock or strap, you need to make sure that the food is not too close to the camera. If it is raised up, you need to push the food back to about 20 feet. Or else you will simply see a tail in the frame. Also, make sure if you can, to point the camera at something solid as the backdrop. These cameras need something to bounce the flash from to make your image visible. If you don’t, you will see a very dark screen.

Another great spot is a bush or something similar. You should get the camera position straight before marking where the food will go. You want to make sure the camera is not seen, but you need to do so, in a way that doesn’t block the actual view of the feeding station.

A common mistake is to place the camera on tall grass or leaves that block the view. There are ways to place them in such environments if you clear a path for the camera to catch the image. When I’m looking at locations, I think about how clear of an image I will be getting if I decide to place it in a certain spot. I take into consideration how hard it will be for people to see, but also, how clear of a shot I will get. Sometimes, if I must have a camera at a certain location, I will raise the camera up above the leaves or sticks with a rock or whatever I can find lying around.

Sometimes placing a camera, a little recessed into the tall grass line can work perfectly. This is more for public places. This is especially true when a dog gets lost in a city. You don’t have time or resources to wait around and ask who owns what abandoned lot. In the picture to the left, the camera is pointed at the tree, where the food is placed. But unless you were looking for the camera it would be hard to see.

The image to the right is a good illustration of trivial things that can get in the way. The streetlamp will most likely blow out the pictures because the camera is going to be pointed towards the wall, and the streetlight towards the camera. Also, be careful of motion in the background. Wind blowing, cars passing, or simply the sun setting. You can’t control everything, but to minimize the number of photos or videos you need to go through, make the frame as tight as possible.

After placing food 10 to 15 feet in front of camera, you want to spray liquid smoke. Mesquite is the best flavor to use. You can make a trail leading right up to the food. Wherever you sense the pet may be entering and exiting from, spray a trail. This will help draw him/her to the camera for that clear shot. Also, for food you should use hot dogs and Moist and Meaty, but any meat will do the trick.
Again, urban environments can be tough. But if you’ve found a spot with little traffic, hiding it under something or next to something will help keep your cameras from getting stolen. Some trappers prefer not to do this, but when you have a dog running around the city, frequenting many lots, trail cameras can help. It’s never a guarantee, but if you’re putting up posters and not getting sightings, one of the reasons could be that your pet is hiding in a remote area. Usually these are dead end streets who only see people coming in and out of work. This is where a trail camera for tracking can really help.

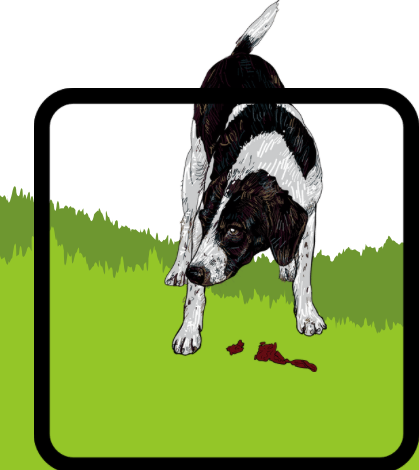
Even though the illustration shows a dog bowl, I prefer to place all the food on the ground. It can be a red flag if an obvious feeding station is left out. This should be the view you get when hiding one of your cameras. Again, it is always best to ask for permission, but in a busy city environment there’s little time before that dog may run in front of a car.


These are how you want to capture the animals in the frame. It is not always going to be a perfect set up, especially if you have little control over the environment. Also, if you leave cameras unsecure, it is important that you collect them early the following morning. This would be for the urban area environments. The trail cameras are only to capture the pet you are looking for and you do so at your own risk. Some people may understand and be sympathetic to your cause, others may not care one bit. Just do your best to get the camera back and go. You can also place a sticker inside the camera that says, “Lost Pet Recovery.” If you are using multiple cameras, numbering them helps keep track of footage. In areas that are more secluded or your own property, take your time to choose the right set up. You can also test the camera out by moving in front of it and waiting for it to either send you an image through cell phone or check SD card. These cameras are invaluable when scrambling for a lead.
Learn how to properly set a feeding station.